Overview
CLICK HERE for the User Manual.
OXO 4K serial number is the same as network WiFi Camera OXO4K_XXXXX.
If you have your product’s original packaging, you can check the box cover to find the serial number.
Camera firmware download here
Please make sure the battery is fully charged before updating the firmware.
Please follow the steps below for updating your camera’s firmware:<
- Download the firmware into your computer
- Unzip the zip file and copy the files to the micro SD card root directory
- Put the micro SD card into the camera and turn your camera on
- The top LED light will automatically flash 4 times, which means that the camera is detecting the new firmware.
- The top light will automatically turn off, which means that the camera is updating its firmware.
- After 2-5 minutes the firmware update will be completed and the camera will automatically turn on (bottom light on and top light flashing).
If you have any questions or need help with your OXO 4K Camera, please don’t hesitate to contact us. Our friendly customer support team is always happy to help.
How to get in touch:
- Submit a request on our website.
- Email us directly at [email protected]
- Your name
- Brief description of the issue
- Camera Serial Number
We do our best to answer all inquiries within 24 hours.
Common Issues
OXO 4K Camera supports up to 4K 30FPS HD 720P 240FPS high frame rate video. For a better shooting experience, please use a microSD card that meets the following specifications:
- class 10 U3 or higher
- 32 – 64GB storage capacity
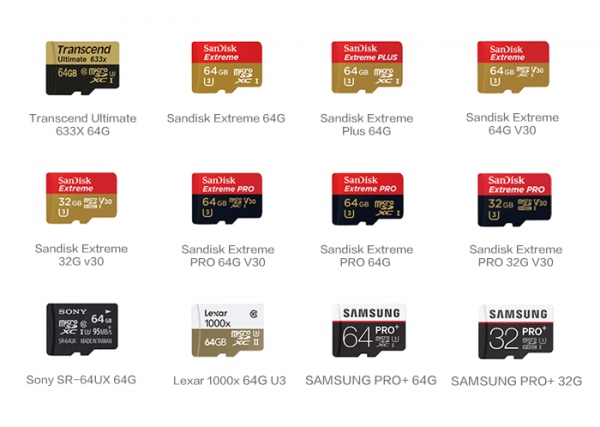
See below for a list of officially recommended microSD cards:
OXO 4K App is available on two platforms – iOS and Android. The following are the supported versions for either of the platforms:
- Android – Android 7 or later
- iOS – iOS 10 or later
The device must support 5Ghz WiFi
Check that the camera is connected to the App. Select -> Advance Settings->Camera Info->Reset Camera -to restore to factory settings
Camera firmware download here
Please make sure the battery is fully charged before updating the firmware.
Please follow the steps below for updating your camera’s firmware:
- Download the firmware into your computer
- Unzip the zip file and copy the files to the micro SD card root directory
- Put the micro SD card into the camera and turn your camera on
- The top LED light will automatically flash 4 times, which means that the camera is detecting the new firmware.
- The top light will automatically turn off, which means that the camera is updating its firmware.
- After 2-5 minutes the firmware update will be completed and the camera will automatically turn on (bottom light on and top light flashing).
Please do not remove the micro SD card or power on/off the device while updating. Damage caused by doing so cannot be repaired.
Please follow the steps below for troubleshooting:
- Charge the battery and plug it to the camera. After charging the battery try rebooting.
- Check if the USB cable is correctly plugged to the camera and to the battery.
- Check if the camera feels too hot. If yes, wait until the camera cools down.
Sometimes the camera may lose its WIFI signal. If this is your case, please try to reset the camera by uploading a different firmware version.
Please follow the steps below for uploading to your camera a different firmware version:
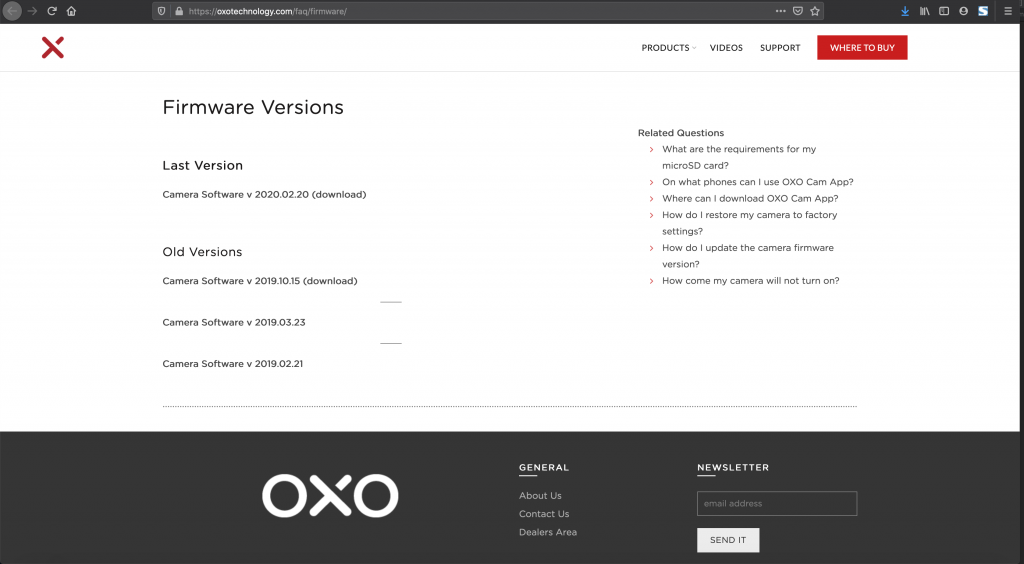
- Go to the Firmware Versions section under the OXO Support web. You can find them here.
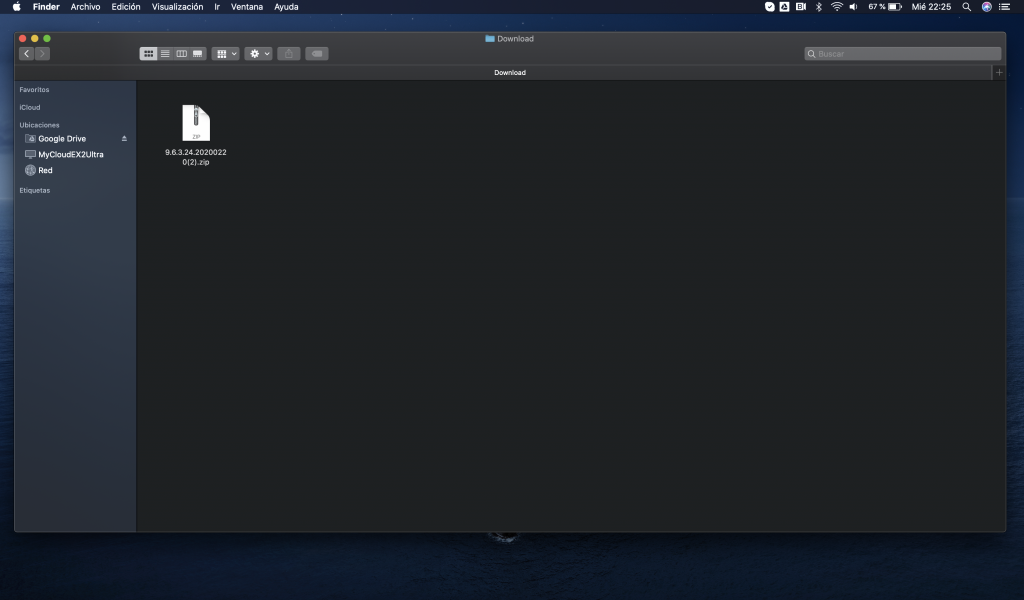
- Download one of the old firmwares into your computer. The firmware will be automatically saved on your computer’s Downloads folder.
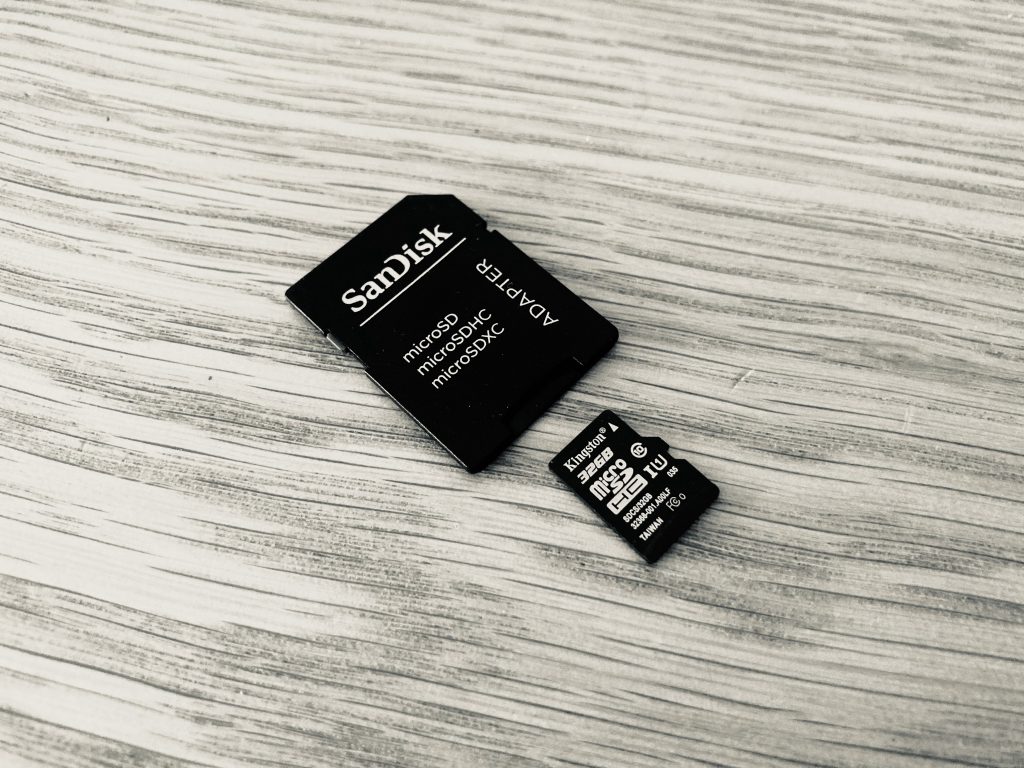
- Insert a microSD card into the SD card adapter that came with the card.
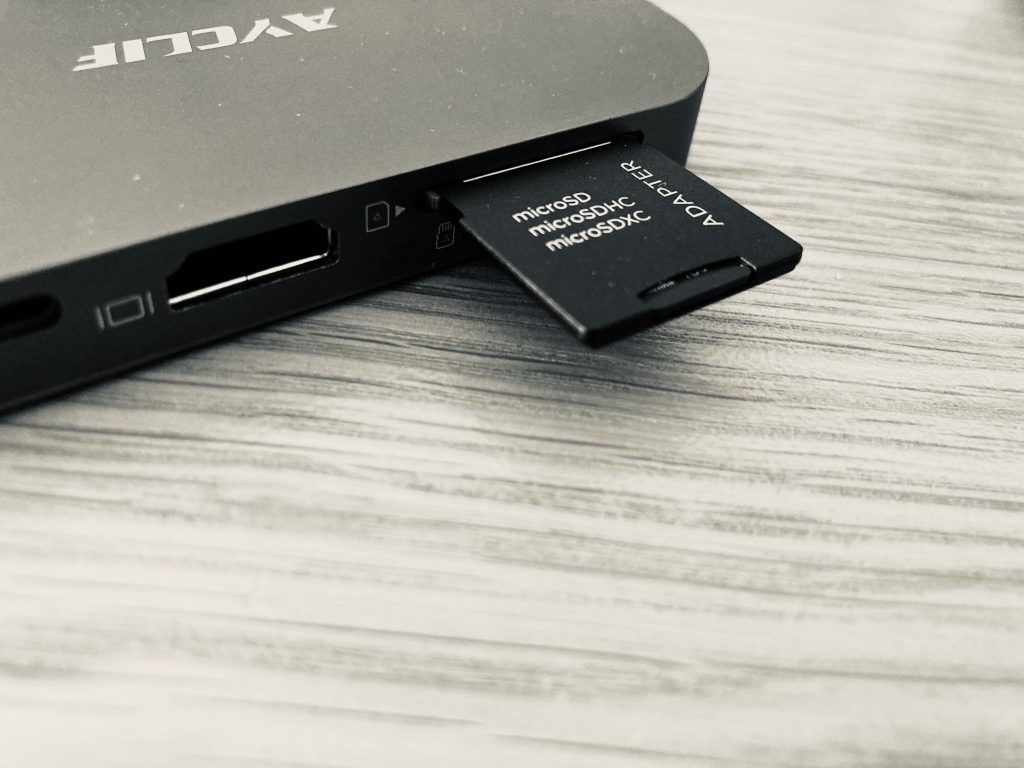
- Connect the SD card adapter directly to your computer or by using an external card reader.
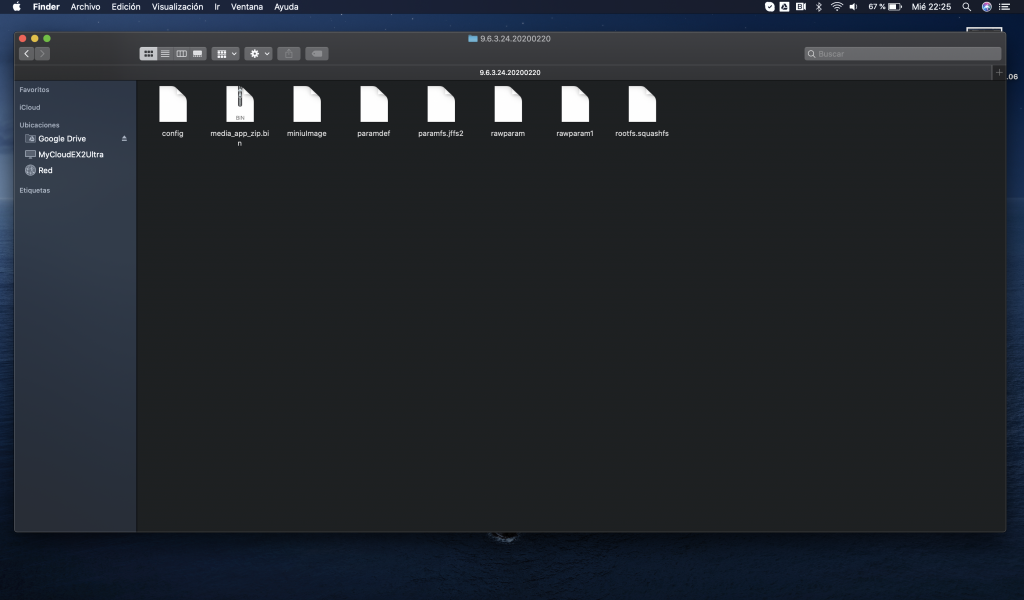
- Open the zip folder, which has been generated when downloading the old firmware.
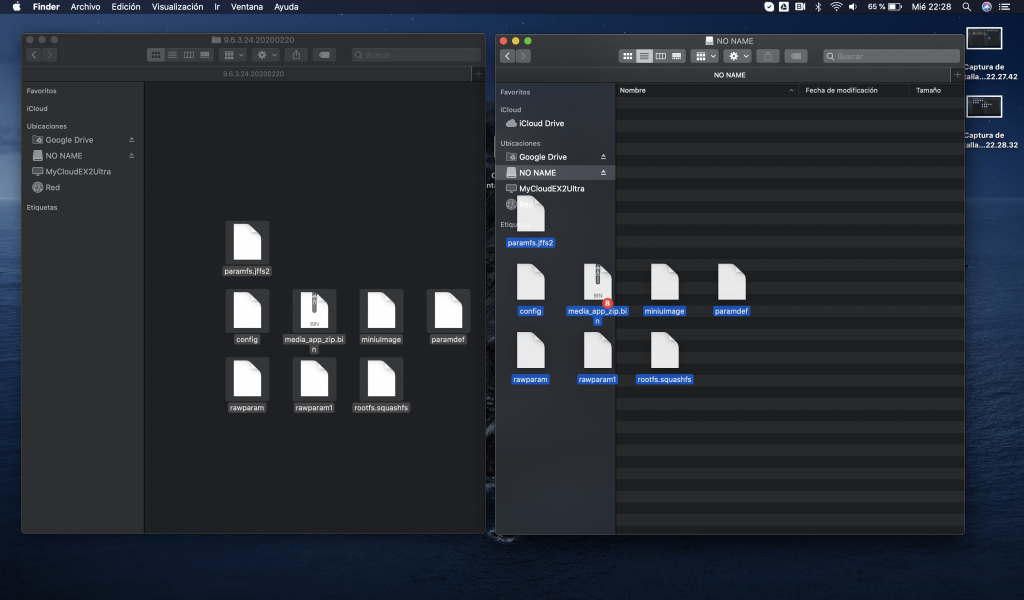
- Copy all the files to the micro SD card root directory, i.e. outside of any folder the micro SD card might have.
- Put the micro SD card into the camera and turn your camera on
- The top LED light will automatically flash 4 times, which means that the camera is detecting the new firmware.
- The top light will automatically turn off, which means that the camera is updating its firmware.
- After 2-5 minutes the firmware update will be completed and the camera will automatically turn on. Please do not remove the micro SD card or power on/off the device while updating. Damage caused by doing so cannot be repaired.
- Now you should be able to find your camera’s WiFi on your mobile device.
Connecting the Camera
Please follow the steps below for troubleshooting:
- Press the shutter/power button to turn on the camera.
- Open the App — There is the option to enter the connection page. Enter the connection page and locate the connect button.
- Locate the camera WiFi (hotspot named OXO4K_ followed by the 7 digit serial number)
- Enter the default password(12345678)to connect to the camera.
Please follow the steps below for troubleshooting:
- Make sure the camera is correctly connected to the App.
- Select ->Settings-> Advance Settings->WiFi Password
- Tap “WiFi Password” to change your password.
- Tap “Confirm”.
Please download the latest version of OXO Cam App.
- Check that the camera’s WiFi is turned on (top front light of the camera must be on). If not, turn WiFi on by pressing the WiFi button during 6 seconds. (See User Manual)
- Check that the App is not connected to a different camera’s WiFi hotspot.
- Check that the App’s WiFi password is correct. The default password is 12345678.
- Check if another phone is connected to the camera. The camera can only be connected to one phone at a time.
- Please make sure that the phone and the camera are within 10 meters from each other.
- Check that there are not too many other WiFi hotspots nearby that may interfere with your connection.
Once the above steps are done and corrected, please exit the App and restart the camera. Open the App and try to connect again.
If the above steps still do not resolve the problem, select-> Advance Settings-> Camera Info->Reset Camera-> Confirm-to restore to factory settings and then reconnect.
The camera’s default hotspot’s name is “OXO4K_” followed by the device’s 7-digit serial number. The default password is 12345678.
Please follow the steps below for troubleshooting:
- Check that the camera’s WiFi is turned on (top front light of the camera must be on). If not, turn WiFi on by pressing the WiFi button during 6 seconds.
- On the App, tap-> Settings-> Advanced Settings->WiFi – and check the WiFi name. Then, search for the WiFi hotspot by this name.
- Check if your smartphone supports 5G. The camera’s WiFi’s support is 5G.
- Please check if there are many other WiFi hotspots near your camera which may cause connection interference. Try to move to other location and reconnect.
- If the phone’s decoding efficiency is poor, this may cause lag while playing back videos.
- We recommend that you download videos before you watch them.
There are several environmental factors that can reduce the maximum range. Given ideal environmental conditions, the App can control the camera with a distance up to 10 meters with 5G WiFi.
Given ideal environmental conditions for 5G WiFi without interference, the App, using camera’s hotspot, can have a video/photo download speed at 30Mbps.
Sometimes the camera may lose its WIFI signal. If this is your case, please try to reset the camera by uploading a different firmware version.
Please follow the steps below for uploading to your camera a different firmware version:

- Go to the Firmware Versions section under the OXO Support web. You can find them here.

- Download one of the old firmwares into your computer. The firmware will be automatically saved on your computer’s Downloads folder.

- Insert a microSD card into the SD card adapter that came with the card.

- Connect the SD card adapter directly to your computer or by using an external card reader.

- Open the zip folder, which has been generated when downloading the old firmware.

- Copy all the files to the micro SD card root directory, i.e. outside of any folder the micro SD card might have.
- Put the micro SD card into the camera and turn your camera on
- The top LED light will automatically flash 4 times, which means that the camera is detecting the new firmware.
- The top light will automatically turn off, which means that the camera is updating its firmware.
- After 2-5 minutes the firmware update will be completed and the camera will automatically turn on. Please do not remove the micro SD card or power on/off the device while updating. Damage caused by doing so cannot be repaired.
- Now you should be able to find your camera’s WiFi on your mobile device.
When the App is connected to the phone, it uses its WiFi channel to control the camera, download photos/videos, and more. Some phones may connect to data networks temporarily while others cannot. Internet connection is expected to resume once disconnecting App from the camera
Up to a maximum of two users can be simultanously connected to the camera WiFi for video preview. However, it is not recommended that more than one user connect to the camera WiFi as this would translate into more power consumption and heat, which might reduce the video recording duration.
When capturing video at high resolutions or high frame rates, the camera may become quite hot to the touch as it requires lots of processing power and large amounts of data being written to the SD card very quickly. In case more than one user is simultanously connected to the camera WiFi previewing the video, the camera will emit the overheating warning sooner.
For several users simultanously watching live streaming video, please use our OXO Wireless HDMI Solution.
In case you have recently updated your iPhone/iPad to iOS 14 or above please see this link.
Otherwise, please go through the following steps to troubleshoot:
- Check that the SD card is inserted into the camera.
- Check that the SD card inserted is included in the list of officially recommended microSD cards (https://oxotechnology.com/faq/what-are-the-requirements-for-my-microsd-card-2/)
- Check that the camera’s WiFi is turned on (top front light of the camera must be on). If not, turn WiFi on by pressing the WiFi button during 6 seconds. (See User Manual)
- Check that the App is not connected to a different camera’s WiFi hotspot.
- Check that the App’s WiFi password is correct. The default password is 12345678.
- Check if another phone is connected to the camera. The camera can only be connected to one phone at a time.
- Please make sure that the phone and the camera are within 10 meters from each other.
- Check that there are not too many other WiFi hotspots nearby that may interfere with your connection.
Once the above steps are done and corrected, please exit the App and restart the camera. Open the App and try to connect again.
If the above steps still do not resolve the problem, select-> Advance Settings-> Camera Info->Reset Camera-> Confirm-to restore to factory settings and then reconnect.
Otherwise, please download the latest version of OXO App.
Camera Operation
Press the shutter button to power on the device. Press the shutter button again to start recording video.
After powering on the camera, use the mobile App to switch to other modes.
Video: Record a segment of video.
| Video Resolution | Frames per Second | Screen Resolution |
|---|---|---|
| 4k | 30 | 3840×2160 |
| 1080p | 120,60,30 | 1920×1080 |
| 720p | 240, 120, 60, 30 | 1280×720 |
Photo: Shoot a single photo
| Photo Resolution | Screen Resolution |
|---|---|
| 12MP | 4000×3000 |
| 8MP | 3840×2160 |
| 5MP | 2560×1920 |
When powering on the camera, the default mode is video. Power on the camera by pressing the shutter button. Then press the shutter button again to start recording a video.
- Please check that the micro SD card is inserted in the camera.
- Please check that the micro SD card has enough capacity (You will hear an alert sound while taking a photo/video with a out-of-space SD card).
- Please make sure the micro SD card is FAT32 formatted.
It is normal that the camera’s surface gets hot while in use. It does not affect camera operations and the quality of your videos and photos. If the camera gets too hot, it will automatically shut down. Please wait until camera cools down to turn it on again.
Please check if you muted the speakers
Sound Settings: Go to-> Settings -> Advance Settings -> Video -> Audio Mute to view or change sound settings.
- Use the included focus card to calibrate your camera
- Place the focus card at the approximate working distance and look through your loupes
- Center the focus card until you see the point in the centre of the image and sharp.
- Move the camera up/down until you see the same image through your loupes and in the App preview.
- If image is defocused, hold the focus card with one of your hands and focus the camera by twisting the lens with your other hand.
- Turn the locking ring anticlockwise until it stops and the lens is firmly fixed.
Video Resolution: 4k (3840×2160) 30 FPS; 1080 (1920×1080) 120/60/30 FPS; 720 (1280×720) 240/120/60/30 FPS
Video Quality: High, Medium, Low
Photo Resolution: 12 MP, 8MP, 5MP
White Balance (WB): Users can change the white balance to adjust the overall photo/video color.
Exposure compensation (EV): Affects video and photo brightness. When shooting in contrasting light conditions, adjust to control the brightness of the video or photo. Value adjustment will by default increase the brightness of the video or photo.
High Dynamic Range (HDR): The camera captures multiple exposure levels and combines them into a single photo for vibrant colors and more detail in both light and dark areas.
ISO: Change the camera settings for photo-sensitivity under low-light environments. Enhance the brightness for photos and videos. The higher the ISO, the brighter the captured photo or video and the greater the noise resulting in a grainier result. The opposite is true as well.
Metering mode: Calculate brightness range. OXO 4K Camera has global, center and spot metering modes.
Field of View (FOV): Wide, Medium, Narrow.
Electronic Image Stabilization (EIS): EIS helps the footage stay clear and stable.
Encoding: H264 or H265.
Rotation: The camera feed can be inverted or rotated 180 degrees.
The camera has a built-in 3-axis gyroscope, 3-axis accelerometer, real-time motion detection camera, and real-time motion compensation which help enhance the image quality to the highest level.
Supported Resolutions:4K fps:30; 1080p fps:120, 60, 30
The camera feed can be inverted or rotated 180 degrees. After pairing the camera to your App, you will go into -> Settings -> Advance Settings -> Select Video or Foto -> Rotate
- Videos will be divided every 3 minutes. After the SD card is full, it will stop recording video.
- SD card must be FAT32. A single video file cannot exceed 4GB. If a video exceeds 4GB, the camera will automatically generate follow-up video clips while recording.
The camera will save until the previously recorded footage.
Sometimes the camera may lose its WIFI signal. If this is your case, please try to reset the camera by uploading a different firmware version.
Please follow the steps below for uploading to your camera a different firmware version:

- Go to the Firmware Versions section under the OXO Support web. You can find them here.

- Download one of the old firmwares into your computer. The firmware will be automatically saved on your computer’s Downloads folder.

- Insert a microSD card into the SD card adapter that came with the card.

- Connect the SD card adapter directly to your computer or by using an external card reader.

- Open the zip folder, which has been generated when downloading the old firmware.

- Copy all the files to the micro SD card root directory, i.e. outside of any folder the micro SD card might have.
- Put the micro SD card into the camera and turn your camera on
- The top LED light will automatically flash 4 times, which means that the camera is detecting the new firmware.
- The top light will automatically turn off, which means that the camera is updating its firmware.
- After 2-5 minutes the firmware update will be completed and the camera will automatically turn on. Please do not remove the micro SD card or power on/off the device while updating. Damage caused by doing so cannot be repaired.
- Now you should be able to find your camera’s WiFi on your mobile device.
The highest fps for 4K video is 30.
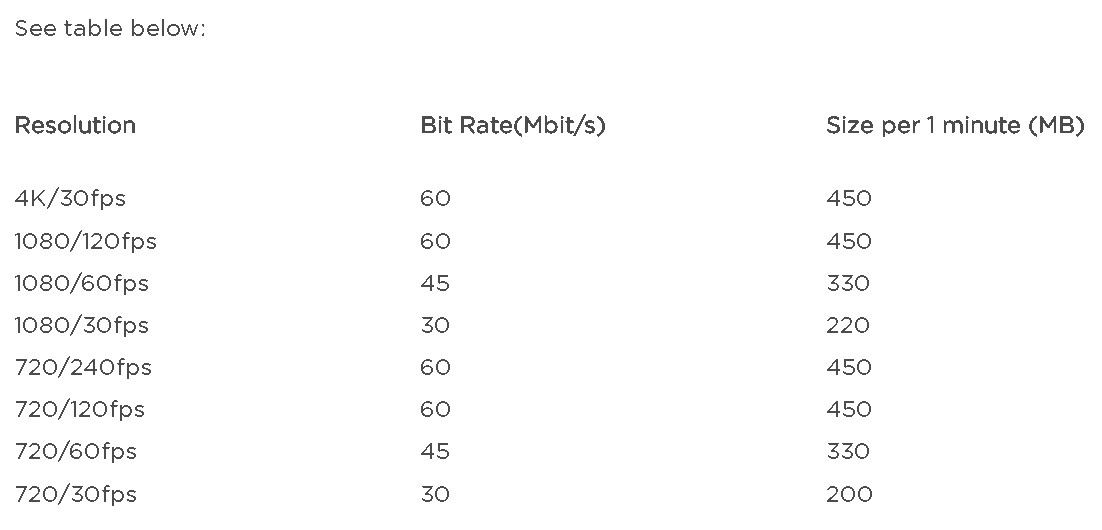
When shooting 4K videos, it will generate 450M of data per minute. The maximum file size that can be downloaded on your smartphone throuth the OXO App is 1.5 Gb.
When shooting a 4K video, huge amounts of data is generated and written to the SD card. If the write speed of the SD card is not fast enough, it will take a longer time. Please choose one of the SD cards we recommended.
After connecting your camera to the OXO App:
- Go to Gallery App
- Select the photo or video to be downloaded
- Press the download button at the bottom of the screen.
- Videos and photos will be downloaded in your smartphone.
4K videos can only be downloaded on 4K smartphones. Please check if your smartphone support 4K resolution videos.
4K videos can only be downloaded on 4K smartphones. Please check if your smartphone support 4K resolution videos.
If you notice that your camera is recording for significantly shorter than expected durations, please follow the steps below for troubleshooting to fix it. You should be able to record continuously until your 64 GB microSD card is full or you opt to stop the recording.
1. Remove HDMI port cover while recording
2. Try recording in a different mode
OXO 4K Camera is able to record in 4K. When using these high resolution or frame rate video modes, it is normal for the camera to become warm and use more power.
Lack of lighting, lack of airflow around the camera or using the camera with the OXO App, further increases camera temperature and power consumption, and decreases camera recording time.
If the camera is stopping a recording without prompt, try decreasing the resolution and/or frame rate to see if the symptom is limited to a certain mode
2. Make sure you’re using a known-good microSD card.
Check out our list of officially recommended microSD cards (see the list)
If your card is too slow, the camera may stop recording as the card can’t keep up with the output of data from the camera, regardless of your recording settings.
3. Charge the battery
Allow the camera to completely charge.
4. Format your SD card in the camera.
If you want to save any files that are currently on your microSD card, please save them to your computer. Next, format your microSD card in the camera by using the Format function of the OXO App.
5. Record a video with your camera
Set your camera to 1080x60fps, and record a video until your 64 GB microSD card is full. The length of the total video(s) recorded will vary depending on the camera and recording environment.
It is normal that you hear some static sound on your recorded files.
When certain external electrical interference or audio frequencies interfere with the audio recording of the camera they will cause a background static noise.
Try recording without making video streaming through the OXO App. This should help to reduce any possible interferences, reducing consequently any static sound.
Video/Photo
On the APP, go to -> Settings -> Resolution. Here you can select the following resolution choices:
- 4k (3840×2160) 30 FPS
- 1080 (1920×1080) 120/60/30 FPS
- 720 (1280×720) 240/120/60/30 FPS
OXO 4K Camera shoots high resolution, high frame rate videos which requires computers with a better spec/video decoder. Please try download third party video player with a more advanced decoder.
For Normal Video Mode: OXON-XXXX
For Photo Mode: OXOP-XXXX
For Slow Motion: OXOS-XXXX
No.Videos and photos are saved on the camera microSD card.
However you can preview the videos and photos on your smartphone by using the OXO App. OXO App also allows you to download to your smartphone all those videos and photos that you select to be downloaded.
You will generally see about a 2-3 frame delay when using HDMI live preview.
No, it does not. 4k videos will be record on 4K/30 but previewed at 1080/30 on a 4K TV via HDMI.
OXO 4K Camera can output a maximum format of 1080/30 through the mini HDMI port
Powering On/Off
Please follow the steps below for troubleshooting:
- Charge the battery and plug it to the camera. After charging the battery try rebooting.
- Check if the USB cable is correctly plugged to the camera and to the battery.
- Check if the camera feels too hot. If yes, wait until the camera cools down.
- Please check if the battery is low. If yes, please charge the battery
- Please check if the camera gets too hot. If yes, please wait until the camera cools down.
- Please check if the cables are well pluged in.
The LED indicates the following status:
- If the bottom light is on, the camera is on. If not, the bottom light would be off.
- If the bottom light flashes, the camera is recording or taking a photo.
- If the top light is on, the WiFi is on. If not, the top light would be off.
- If the top light flashes, the WiFi is on, but not connected to the App.
- Turn on/off camera
- Start/Stop recording
- Full SD Card
- Overheating Warning
Battery
High density lithium polymer battery, 7500 mAh.
Charging Requirements: Input current 1,5A Output voltage 5V
The computer or adapter’s output current and voltage may not meet the charging requirements.
We highly recommend you charge the camera using the included compatible charger.
You cannot simultaneously charge and record. We recommend you use our easily interchangeable extra battery (OXO Power) so that you don’t ran out of battery.
- Some computers cannot provide sufficient voltage to properly charge the camera.
- We highly recommend you charge the camera using the included compatible charger.
You can not connect the camera directly to the power source with no damage.
Micro SD Card
OXO 4K Camera supports up to 4K 30FPS HD 720P 240FPS high frame rate video. For a better shooting experience, please use a microSD card that meets the following specifications:
- class 10 U1 or higher
- 32-64GB storage capacity
See below for a list of officially recommended microSD cards:
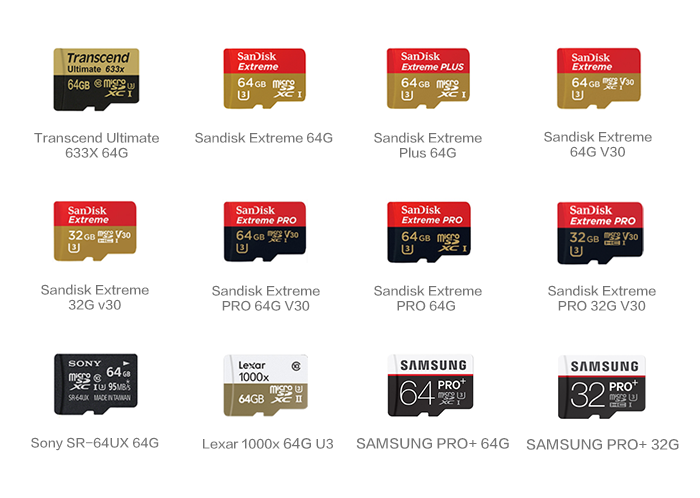
- You can use the SD card reader to copy photo or video files to a computer for viewing.
- You can also go to Album on the mobile App to download the photo or video files to your phone and view it in the App under “Album.”
- Only SD cards between 32-64GB in size are compatible.
- Make sure the SD card is the correct format.
- The SD card should be in FAT32 format. If it is in Block32KB format, we recommend you enter ->Settings -> Advanced Settings->SD Card -> Format SD Card” on the App.
Some 128GB memory card can work with in the OXO 4K Camera, but others might present some incompatibility issues with the camera. Additionally, it is preferably to have two 64 GB microSD cards rather than one 128GB microSD card so that in case of card damaging you don’t loose all your work
See below for a list of officially recommended microSD cards:

DCIM is short for “Digital Camera Images.” DCIM is a folder that is automatically created on the SD card by your camera. The camera use the DCIM folder to store the videos and photos captured by the camera.
When power is off abnormally during a video recording, for instance due to battery running out or USB cable getting disconnected by mistake, you will be able to recover the broken file from the Recovery folder.
All the videos and photos captured by your camera are stored in the DCIM (Digital Camera Images) folder, which is automatically created on your SD card.
Please make sure the microSD card is the correct format, FAT 32. If your SD card has an exFAT32 format, the camera cannot recognize the SD Card. You will need to format the SD card to get the correct format FAT 32.
Formatting a microSD card to FAT 32 can be done by following these steps:
- Insert the microSD card into the SD card adapter that came with the card.
- Connect the SD card adapter to your computer by using an external card reader.
- Save all the files from your SD card that you want to keep to your computer before moving to next step Formatting the SD card deletes all the data off of the card.
Windows
Formatting a microSD card to FAT 32 can be done by following these steps:
- Click on the SD card icon through the Windows operating system.
- Right click on SD card icon > Format > File type >FAT 32
If your PC operating system is Windows 10 we recommend you to use the external software GUIFormat:
https://www.softpedia.com/get/System/Hard-Disk-Utils/FAT32format-GUI.shtml
Mac
Formatting a microSD card to FAT 32 can be done by following these steps:
- Got to Applications> Utilities.
- Open Disk Utility.
- Find the SD card in the left side of the window.
- Click the ERASE tab in the middle of the window.
- Next, click on the Format dropdown menu. Select FAT 32.
- Click Erase.
Lens
When you first notice dark specks on your videos or photos, check your camera lens to see if any dirt has settled there.
If your black spots appear consistently in the same location, you have probably got dust particles on your sensor. This is a common problem for cameras with interchangeable lenses.
Dirty optics can affect your image quality. If you notice any spot on your videos or photos, please follow the steps below for troubleshooting:
- Clean your lens.
- If the issue persists, clean the sensor.
Your OXO 4K Camera comes with a 25mm lens, however you can also use the 16mm to get a greater angle of view and a greater depth of field allowing you to wide your AOV. In case you are changing lens please follow these steps:
- Make sure that both lens you want to switch have their lens caps firmly affixed to them.
Set the lens that you want to attach to the camera on a stable, flat surface, with the front element pointed down. - Make sure that the camera is turned off. This is important because it cuts off power to the camera’s sensor. When power is on, the resulting electric charge could attract dust.
- Point the camera down. By keeping the camera pointed downward, you will prevent anything form falling into the open lens port, and you may also encourage contaminants already in the camera to fall out.
- Hold the body of the camera with one hand and disengage and remove the lens with the other hand.
- Keeping the camera pointed downward, set the lens down next to the other lens, also on its front element.
- Quickly remove the end cap from rear element of the new lens and place it on on the rear element of the old lens. Then pick up the new lens and attach it to the camera body by screwing.
- When you have securely affixed the replacement lens, go back to the old lens and screw the end cap onto it.
If you have a camera with interchangeable lenses it’s almost impossible to avoid getting dust on your sensor
To reduce the amount of dust that the sensor collects:
- Never store the camera whithout a lens.
- Minimize the number of times you change lenses and minimize the amount of time the lens is off the camera.
- When you change lenses, make sure the body of the camera is pointed down and the camera is turned off.
- Try not to change lenses in dirty environments.
First try blowing off dust from the lens, then use the included cleaning cloth to clean the lens in circular motion starting from the middle of the lens.
The sensor is a high precision component therefore we do not recommend you clean it yourself. Please contact your local dealer for professional assistance to clean the sensor.
Other Issues
The operating temperature range is 0°C ~ 45°C. If working under low temperatures for a period of time, the camera will heat up to maintain normal temperature. Under a lower temperature environment, such as -10°C, the camera may not function.
- Do not expose the camera to direct sunlight.
- Do not put it near a heat source.
- Do not cover it.
- Remove HDMI port cover while recording (Important!)
It is common for the camera to be warm to the touch. The camera’s body acts as a heat sink for the processor, allowing heat from the internal parts to escape from the camera.
When capturing video at high resolutions or high frame rates, the camera may become quite hot to the touch as it requires lots of processing power and large amounts of data being written to the SD card very quickly. You will also find that the SD card is hot too. Please remove the HDMI port cover while recoding in order to reduce the temperature inside the camera.
Your camera has been designed to identify conditions of overheating and shuts down when needed. It allows it to achieve high levels of performance, while maintaining good operating conditions for the internal components. Its operating temperature is in accordance with regulation IEC 60950-1 on the safety of information technology equipment.
If the camera gets too hot and needs to cool down, the camera emits a bip indicating that the camera is shutting down. Simply let it sit and cool before attempting to use it again.
OXO 4K Camera has a maximum of 12 million pixels. The maximum resolution is 4000×3000.
You can clean the surface of your OXO 4K Camera with the included cleaning cloth.
DO NOT use alcohol, harsh cleaners or solvents to clean the camera.
You can disinfect the surface of your OXO 4K Camera with alcohol-free disinfectant wipes
To connect the camera to your TV you will need a slim High Speed HDMI cable with Ethernet- HDMI to HDMI Mini M/M so that you can connect the camera’s HDMI Mini (type C) port to a display/device with and HDMI (type A) port.
We recommend the 1,8m Slim High Speed HDMI Cable with Ethernet – HDMI to HDMI Mini M/M by manufacturer StarTech (Product ID: HDMIACMM6)
To connect the camera’s HDMI Mini (type C) port to a display/device with and HDMI (type A) port you will need a a slim High Speed HDMI cable with Ethernet- HDMI to HDMI Mini M/M.
We recommend the 1,8m Slim High Speed HDMI Cable with Ethernet – HDMI to HDMI Mini M/M by manufacturer StarTech (Product ID: HDMIACMM6)
Please follow the steps below for troubleshooting to fix it.
- Make sure that your HDTV Input Channel is set to the same input port that you have the HDMI Cable connected to. For example: HDMI Input Port 3, set TV to HDMI Input 3. If the input on the TV is set incorrectly, you will not get any preview.
- Make sure that the camera is OFF before you connect the camera to the HDMI Cable. Once the camera is ON and connected you should initially see a live preview of whatever the camera is currently facing.
- Try connecting the camera to a different HDMI Cable if you have one available. Are you using our recommended HDMI Cable or a generic brand? If possible, try connecting the camera to a different TV or TV input port.
If nothing else works, perform the software update, or re-flash the software update if camera is already up-to-date, as this can restore the proper HDMI functions.

